Table of Contents
ToggleYour kitchen island is often the hardest-working and most-seen surface in the home, but the wall behind it gets overlooked. That bare stretch of drywall (or worse, outdated tile) is missed potential. The right wall treatment transforms your island from a prep station into a design anchor that ties your whole kitchen together. Whether you’re working with a tight budget, renting (so adhesives only), or ready to tackle structural changes, there’s a kitchen island wall idea that fits your skill level and vision. Let’s walk through ten designs you can actually execute.
Key Takeaways
- Kitchen island wall ideas range from budget-friendly paint and peel-and-stick options to premium tile and shiplap installations, accommodating every skill level and timeline.
- Proper surface preparation—sanding glossy finishes, using primer, and cleaning thoroughly—is essential to ensure paint and tile adhesion lasts more than a year.
- Bold colors (dark green, navy, terracotta) work best when your island cabinetry remains neutral to avoid overwhelming visual weight in the space.
- Lighting fixtures hung 30–36 inches above the island counter and floating shelves anchored securely into studs transform a plain wall into a functional focal point.
- Tile selection impacts both aesthetics and maintenance: darker grout hides spills while larger format tiles create a seamless modern look with fewer grout lines.
- Budget-conscious solutions like stenciled patterns, removable wallpaper, or salvaged wood offer personality without commitment, perfect for renters or those testing design ideas before permanent changes.
Modern Minimalist Wall Treatments
Clean lines and neutral tones keep the focus on your island cabinetry and countertop. A simple painted drywall in soft white, warm gray, or soft taupe works best when your island already has texture or detail.
For a no-damage rental option, consider large adhesive wall panels in matte white or light gray. They apply in hours and peel off without damage. Ensure the wall is clean and dry before application.
If you own and want to commit, primer two coats of quality interior paint (Benjamin Moore, Sherwin-Williams, or equivalent mid-range brands) with a satin or matte finish hides imperfections better than glossy options. Expect 400–500 sq. ft. coverage per gallon. Sand any existing glossy finish lightly with 220-grit sandpaper to improve paint adhesion. This isn’t glamorous prep work, but skipping it almost always means the finish peels or chips within a year.
White-on-white minimalism pairs especially well with stainless steel hardware, matte black pendant lights, and natural wood or concrete counters. The philosophy here: let the island itself be the statement.
Bold Color and Paint Finishes
Dark green, navy, charcoal, or even soft terracotta can anchor a kitchen when applied to the island wall. Bold color works best if your island cabinetry is neutral (white, natural wood, or light gray), otherwise the visual weight gets too heavy.
Choose a premium interior paint with good hiding power: cheaper paint often needs three or four coats to achieve saturated color. Invest in one quality coat of primer first, especially over white or existing color. Let primer fully cure (check the can, usually 1–3 hours) before painting the color coat.
For a more durable, sophisticated finish, consider eggshell or satin over flat or matte. These reflective finishes are easier to wipe clean if you splash water or spill oil. Avoid high gloss near a cooking area: it shows every fingerprint and splatter.
Edge protection matters: use painter’s tape along the ceiling line and adjacent walls. Apply it at a 45-degree angle, press firmly, and remove it while the paint is still slightly tacky (within 24 hours) to avoid peeling the finish with dried paint edges.
Textured and Shiplap Designs
Shiplap adds rustic charm or farmhouse character, and the tongue-and-groove joints hide imperfect wall surfaces. Real shiplap uses solid wood boards (pine, cedar, or manufactured shiplap) at nominal 1″ × 6″ or 1″ × 8″ dimensions. Actual thickness is about ¾”, actual width about 5.5″ or 7.5″ (accounting for milling tolerances).
Prepare your wall by locating studs (typically 16″ on center) using a stud finder. Studs matter: you’ll need them to nail shiplap securely. Use 2.5-inch stainless steel finish nails or 2-inch stud-driven screws to avoid rust staining, crucial near moisture. Drive nails through the tongue of the board into studs, allowing the next board’s groove to hide the fasteners.
Alternatively, peel-and-stick shiplap wall panels skip the structural commitment. These adhere to clean, flat drywall and peel off if you move. Coverage is fast, one afternoon for a 4-foot island wall, but adhesion depends on wall prep. Sand glossy surfaces, clean thoroughly, and let any primer cure completely.
Texture beyond shiplap: textured drywall spray (orange peel, popcorn, knockdown) adds visual interest and hides minor drywall damage. Knockdown (a slightly flattened texture) suits modern kitchens better than popcorn, which traps dust and looks dated. Spray it yourself with rental equipment from hardware stores, or hire a drywall pro if you’re unsure about technique.
Tile and Backsplash Inspiration
Tile behind the island isn’t just functional, it’s a design statement. Small subway tiles (3″ × 6″) in white, cream, or soft gray are timeless and easy to maintain. Larger format tiles (**12″ × 24″ or 18″ × 36″) create a modern, seamless look with fewer grout lines.
Mosaic or patterned tiles add personality. Encaustic tiles (hand-painted geometric patterns) or zellige (handmade Moroccan-style) tiles work for eclectic, artisan aesthetics. Budget more: decorative tiles run $8–$15+ per sq. ft. versus $1–$5 for basic subway tile.
Grout color matters as much as tile. Light grout shows dirt and stains: darker grout (gray, charcoal) hides spills and requires less maintenance. Use epoxy grout over cement-based grout near a cooking zone, it resists staining and mold better, though it’s trickier to apply. If you’re a first-timer, cement-based grout is more forgiving.
For DIY tile installation, you’ll need a notched trowel (size depends on tile format), tile spacers (usually 1/8″ to 1/4″), a wet saw or angle grinder with a diamond blade for cuts, and safety gear, especially dust mask and eye protection. Tiling an island wall (typically 30–48″ tall, varies by island width) is a weekend project if you’re careful with layout and cutting. Prime and waterproof the drywall with cement board or RedGard before tiling to prevent moisture damage.
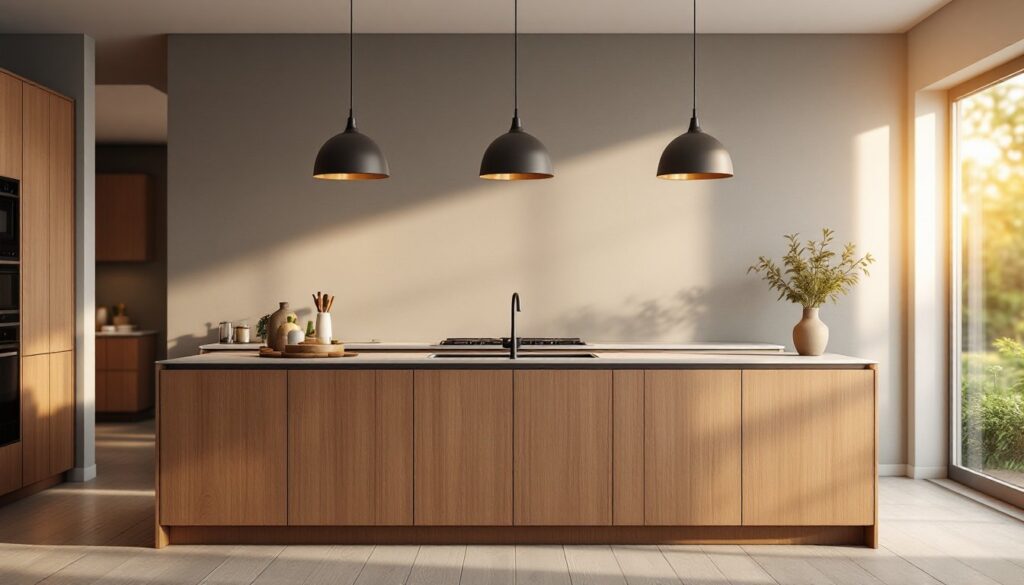
Lighting and Accent Wall Features
Even a simple wall becomes a focal point with well-placed lighting. Pendant lights hung 30–36″ above the island counter focus light where you prep food and create visual rhythm. Install an electrical box and rough-in wiring if you don’t have one, this is a job for a licensed electrician if you’re not confident. Code typically requires a grounded circuit and proper box depth (usually 2–3″) behind the wall.
Recessed lighting on the same circuit adds ambient glow. Space recessed lights 4–6 feet apart for even coverage. Installing them requires cutting holes in drywall and running wiring: again, code and safety matter here.
Floating shelves on the island wall combine storage and display. Use heavy-duty brackets rated for your load (assume 30–50 lbs. per shelf if stocked with cookbooks or bowls). Anchor brackets into studs with ¼-inch lag bolts or heavy-duty fasteners, not drywall anchors alone. A poorly secured shelf loaded with cast iron or pottery is a safety hazard.
Wall-mounted spice racks, magnetic strips for knives, or a pegboard for utensils blend function with design. These work best on a textured or tiled wall (shiplap allows easy screw mounting into the wood: tile requires specific fasteners and careful drilling).
Budget-Friendly DIY Wall Solutions
Paint is the fastest, cheapest transformation. A quality gallon of interior paint (Sherwin-Williams, Benjamin Moore, or regional equivalents) costs $30–$60, covers 400–500 sq. ft., and completely refreshes a wall in a day. Add a stud finder ($15–$25), painter’s tape, drop cloths, and basic brushes/rollers, and your total is under $100.
Wallpaper or peel-and-stick fabric offers pattern without permanent commitment. Modern removable wallpaper doesn’t damage paint when removed carefully (pull at a low angle, slowly). Cost ranges from $20–$60 for smaller kitchen walls. Look for options on design sites that curate budget-friendly, high-quality selections.
Stencils applied with paint create pattern without tiling or wallpaper. Geometric patterns, Moroccan designs, or stripes can suit many aesthetics. A stencil kit plus paint runs $20–$50, and application takes an afternoon. Tape the stencil down firmly, use a stippling motion (dab, don’t drag) with a brush or sponge, and lift the stencil before the paint fully dries to avoid drips.
Reclaimed or salvaged wood boards (barn wood, pallet wood) cost less than new shiplap and add character. Source them locally, Habitat for Humanity ReStore, architectural salvage yards, or even free pallets cleaned and milled. Installation follows the shiplap method: stud-mounted and nailed. Always inspect salvaged wood for nails, rot, or insect damage before installing.
DIY tile with careful planning keeps costs low. Buy mid-range subway or cement tiles online (often cheaper than big-box stores), rent a wet saw, and invest time in layout. Mistakes happen, budget for extra tiles and grout.
Conclusion
Your kitchen island wall deserves as much thought as the island itself. From minimalist paint to bold tile, textured shiplap to accent lighting, the options fit every budget and skill level. Start with what works for your timeline and commitment level, a fresh coat of paint or removable wallpaper if you’re testing ideas, or tile and structural finishing touches if you’re in your forever home. The key is choosing a design that complements your island and kitchen layout, then executing the prep work with care. Measure twice, prep surfaces properly, and don’t skip safety gear. A well-executed wall turns your island into the heart of your kitchen that it truly is.