Table of Contents
ToggleA basement home theater is one of the most rewarding projects a homeowner can tackle. Unlike a typical room renovation, a basement theater combines practical construction, A/V installation, and thoughtful design into a space that genuinely improves daily life. Whether you’re hosting movie nights, gaming sessions, or sports events, a dedicated theater transforms underused square footage into an entertainment hub. This guide walks you through the essentials: why basements work so well, what equipment you’ll need, how to light and outfit the space, and how to make every seat comfortable. With some planning and the right approach, you can create a professional-quality theater without a contractor’s price tag.
Key Takeaways
- Basements are ideal for basement home theater ideas because they’re naturally dark, acoustically forgiving, and offer excellent ceiling height for proper screen mounting and multi-row seating.
- Choose a projector with 3,000–4,000 lumens minimum for dark rooms and pair it with a fixed matte or gray screen sized to fill your field of view without causing neck strain.
- A basic 5.1 channel surround sound system ($800–$2,000) dramatically improves audio quality over TV speakers and is essential for separating a mediocre theater from a great one.
- Control light by eliminating direct sources, installing dimmable recessed lights at 10–20% brightness, and using warm white (2700K) LEDs to maintain the theater atmosphere.
- Invest in quality recliners with lumbar support and arrange seating in staggered rows using the 1.5× screen width rule to eliminate sight-line obstruction and maximize comfort.
- Address moisture issues upfront with a humidity test and dehumidifier, as electronics and damp conditions create costly problems that can ruin your entire project.
Why Your Basement Is The Ideal Home Theater Location
Basements offer natural advantages that above-ground rooms simply can’t match. First, they’re naturally dark, a critical requirement for image quality. Ambient light kills contrast on a projector screen or TV, and basements typically have few windows or none at all. You won’t need blackout curtains as heavy as you would upstairs, saving money and maintenance headaches.
Second, basements are acoustically forgiving. Sound bounces around less predictably in square rooms upstairs: basements, especially if they’re partially below grade, naturally contain sound better. This means your neighbors won’t hear explosions at 11 p.m., and you won’t hear street noise leaking into your dialogue.
Third, ceiling height and layout usually work in your favor. Most basements offer 8 feet of clearance or more, enough for a projector mount and adequate sight lines for multiple rows of seating. Building codes and load-bearing concerns are also simpler in basements since you’re not altering the home’s structural skeleton.
One caveat: check for moisture issues before you start. Run a moisture test (a simple plastic-sheeted square left overnight will show condensation if there’s a problem). If humidity is high, install a dehumidifier and address any water intrusion at the foundation level. Electronics and dampness don’t mix, and mold will ruin your project faster than any other mistake.
Essential Audio-Visual Equipment For Basement Theaters
Projectors, Screens, and Display Options
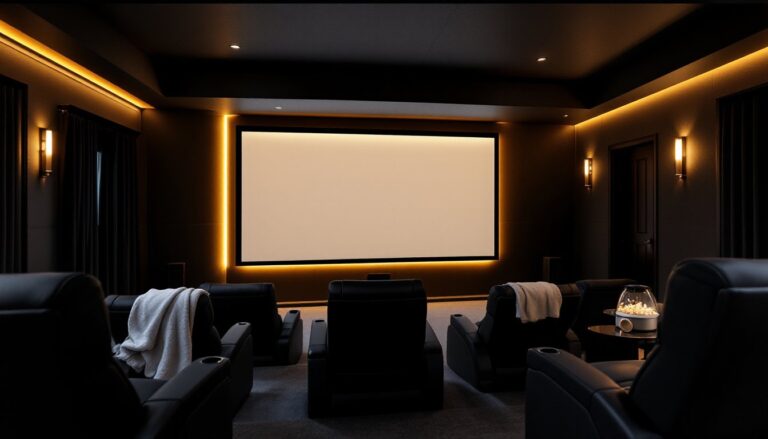
Your core decision is projector versus large-format TV. A quality projector with a 100+ inch screen delivers the true theater experience, but requires a dedicated dark space and regular bulb maintenance. A 65-85 inch 4K TV is more forgiving in mixed-light conditions, cheaper upfront, and requires zero maintenance. For most basement builds, a projector wins on the experience side.
Projector brightness matters: look for 3,000-4,000 lumens minimum in a dark room, and 5,000+ if you’re adding ambient lighting. Throw distance (the distance from projector to screen) depends on your ceiling height and room length, measure twice before buying. A short-throw projector (sitting 4-8 feet from the screen) is ideal for tight basements.
For screens, fixed installations are better than motorized pull-downs for permanent setups. A white matte screen reflects light evenly across the room: a gray screen improves contrast in rooms with slight ambient light. Size your screen to fill your field of view when seated, the image should be comfortable to watch for two hours without neck strain.
Sound System Setup and Acoustics
Audio quality separates a mediocre home theater from a great one. A stereo TV speaker can’t compete with a proper surround setup. A basic 5.1 channel system, front left and right speakers, a center channel, two surround speakers, and a subwoofer, costs $800–$2,000 and transforms the experience. A 7.1 system (adding rear surrounds) is better for larger rooms.
Place your center channel speaker on a shelf or stand at ear level when seated, pointed slightly down. Left and right speakers flank the screen at similar heights. Surrounds go on side walls at ear level or slightly above. The subwoofer (the bass component) can go in a corner, bass frequencies are non-directional, so placement is flexible. Calibrate volumes using your receiver’s test tones, starting with all speakers at the same output level.
Acoustics matter as much as equipment. Sound bounces off hard surfaces, concrete floors and drywall, creating echoes that muddy dialogue. Soft furnishings (rugs, curtains, seating) absorb sound naturally. If reflections are severe, add acoustic panels on walls or ceilings, or use absorptive bass traps in corners. You don’t need expensive branded panels: cheap rockwool panels wrapped in fabric work well and cost a fraction of the price. Focus absorption on the first reflection points, the walls closest to your speakers.
Lighting and Ambiance: Creating the Theater Mood
Theater lighting isn’t about brightness, it’s about darkness with subtle control. Eliminate all direct light sources first. If your basement has small windows, cover them with blackout panels or heavy curtains. Seal any gaps around pipes, ducts, or structural elements with black caulk or expanding foam. Doorways are culprits too: install weather stripping or a blackout door sweep.
For functional light, install dimmable recessed lights on a separate circuit from your main overhead. Set them low (10-20% brightness) so you can navigate before the movie starts, then dim them completely once it begins. Wall-mounted LED bias lighting (a thin strip of warm LEDs behind the screen) reduces eye strain during long viewing sessions without causing glare on the screen.
Emergency exit lighting is a code requirement in many jurisdictions, especially if your basement is a dedicated media room. Check your local IRC (International Residential Code) for egress and lighting rules. A simple battery-backup exit sign above the stairs is typically sufficient for a residential home theater.
Color temperature matters too. Use warm white (2700K) LEDs rather than cool white: warm light feels more theater-like and doesn’t wash out projected images. Avoid red or blue mood lighting unless you’re going for a specific aesthetic, it makes skin tones look terrible on screen.
Seating Solutions and Comfort Essentials
Seating is where people spend the most time, so don’t skimp. A sagging couch borrowed from the living room won’t cut it for a six-hour movie marathon. Real home theater recliners cost $400–$1,000 each, but they’re worth it if you use the room regularly. Look for recliners with lumbar support, cup holders, and USB charging ports. Leather or vinyl is easier to clean than fabric.
Arrange seating in staggered rows if space allows, front row lower, back row elevated on a platform. This eliminates heads blocking views and improves the sight line to the screen. A 12-inch rise per row is standard. Measure your screen width and apply the 1.5× rule: viewers shouldn’t sit closer than 1.5 times the screen width. For a 100-inch screen, that’s roughly 12 feet back minimum.
Comfort accessories matter. Stock throw blankets and pillows in a basket nearby, they’re cozy and improve the theater vibe. A popcorn machine or concession stand sounds indulgent, but it’s surprisingly affordable ($150–$400) and adds personality. If you’re serious about the experience, run the Top Home Renovation Ideas to Transform Your Space to see how others have integrated snack stations into their theaters.
Consider sound insulation in seating areas if you’re next to bedrooms or living spaces. Bass from the subwoofer travels through floors and walls, so decoupling the seating platform from the rest of the basement with rubber isolation pads under recliner legs reduces vibration transfer.
Conclusion
Building a basement home theater is a project that pays dividends in entertainment value and home enjoyment. Start with the space itself, check moisture, seal light leaks, and plan your layout around viewing angles. Choose A/V equipment that fits your room size and budget, not marketing hype. Sound quality often matters more than picture resolution, so invest accordingly. Control light and acoustics thoughtfully: they’re cheaper fixes than swapping out gear later. Finally, prioritize seating comfort: the best movies and games are only as good as the experience of watching them. Your basement can become the space your household actually uses every day. Professional home theater designers spend months on these projects. You’ll do it smarter and cheaper, and you’ll know exactly how every piece works.