Table of Contents
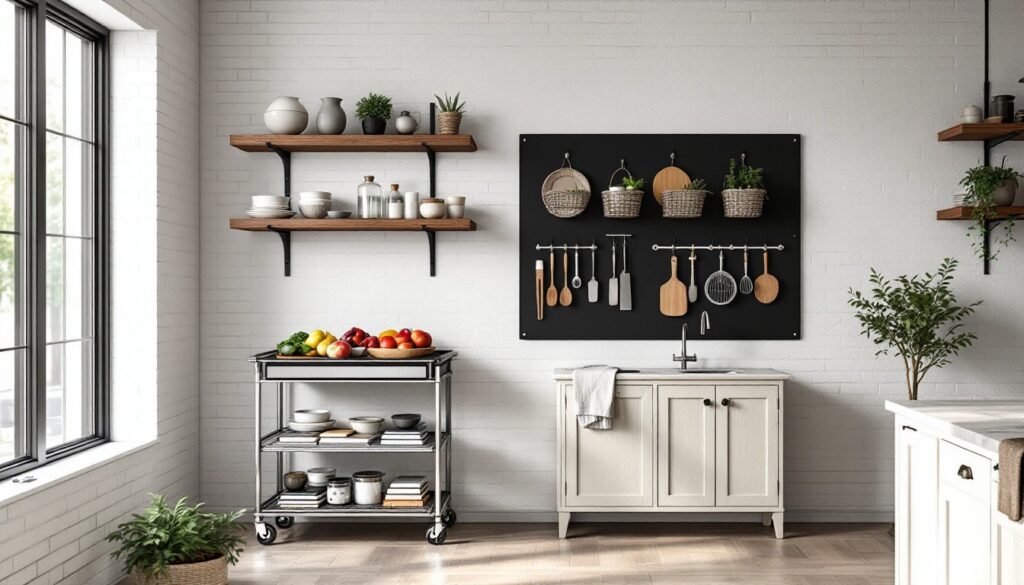
ToggleA kitchen without cabinets sounds radical until you see it done right. Instead of closed storage dominating wall space, open shelving, floating units, and freestanding pieces create visual breathing room while keeping everything within arm’s reach. This approach works whether you’re downsizing, renovating on a tight budget, or simply craving a fresher, more intentional kitchen. The key isn’t going without storage, it’s choosing storage that doubles as design. Here are seven practical alternatives that work for real kitchens, not just Instagram feeds.
Key Takeaways
- Open shelving and floating shelves remove visual clutter and create an airy feel while requiring items to be stylish enough for daily display.
- Kitchen without cabinets ideas include freestanding islands, rolling carts, and pegboards—all flexible alternatives that can be moved or adjusted as your needs change.
- Proper installation is critical: floating shelves and open shelving must be anchored into wall studs, with adequate load capacity (typically 50-75 pounds per shelf) for safe storage.
- Rolling carts with quality casters, wall-mounted pot racks, and magnetic knife strips maximize vertical space and keep frequently used items within arm’s reach without permanent commitment.
- Mix-and-match furniture pieces like bookshelves, vintage sideboards, and dressers cost less than custom kitchen cabinetry while adding character and allowing you to spread renovation costs over time.
- A kitchen without cabinets succeeds when items are organized intentionally, dust is managed through good ventilation, and the design reflects how you actually cook and live in the space.
Open Shelving: A Modern Alternative to Traditional Cabinets
Open shelving removes the visual weight of cabinet doors and creates an airy feel, especially in smaller kitchens. Instead of hiding dishes and glassware, you’re displaying them, which means everything must earn its place. Plates, bowls, and glassware should be attractive enough you don’t mind seeing them daily.
Material choices matter. Solid wood shelves (oak, walnut, or reclaimed pine) add warmth and durability. Metal brackets in steel or black iron provide industrial character. For a cleaner look, invisible mounting brackets hide the support hardware entirely. Standard shelf depth is 12 inches for most dishes: go 15 inches if you’ll stack larger serving pieces.
Loading capacity is real. A 24-inch-wide wooden shelf held by proper lag bolts can safely hold around 50 to 75 pounds depending on bracket quality and stud spacing. Always mount into wall studs (typically 16 inches on center), not just drywall. Use a stud finder before drilling.
The trade-off: no doors mean dust settles on items, and you’ll organize more intentionally. Keep everyday dishes front and center. Relegate occasional-use pieces to higher or less visible shelves. Open shelving pairs well with good ventilation, a range hood becomes a design feature, not an eyesore. Home Renovation Ideas Examples often showcase how professional kitchens make open storage look polished and purposeful.
Floating Shelves and Wall-Mounted Storage Solutions
Floating shelves are open shelving’s sophisticated cousin, they mount flush to the wall with no visible supports underneath, creating a sleek, minimalist effect. The magic is in the hidden bracket system (usually a steel cleat bolted to studs, then the shelf slides over it).
Measure carefully: mark your studs with a stud finder, use a level to check alignment, and pre-drill all holes. A 36-inch-long floating shelf in solid wood should be 1.5 inches thick and weigh up to 40 pounds loaded, well within safe limits if bolted properly into two studs.
Wall-mounted pot racks, magnetic strips for knives, and hanging rails for utensils work alongside floating shelves. Magnetic strips are particularly practical, quality ones (stainless steel with strong neodymium magnets) cost $15 to $40 and hold chef’s knives securely without dulling the blade. Pot racks maximize vertical space above a counter or island. A wrought-iron pot rack costs $50 to $150 and can support 8 to 12 medium-weight cookware pieces.
Here’s the honest part: floating shelves require more precision installation than shelves with visible brackets. If studs aren’t perfectly positioned where you want shelves, you’ll either adjust placement or hire a handyperson. Mistakes show immediately on floating shelves, so this isn’t a “close enough” project. Wall-mounted solutions generally take 1 to 2 hours per shelf to install properly.
Freestanding Kitchen Islands and Carts
A freestanding island or cart works as a centerpiece and workhorse rolled into one. Unlike built-in cabinetry, you can move it, adjust shelving, or swap it for something different if your needs change. Islands come in countless styles: butcher-block tops with open storage below, tiered metal frames, repurposed vintage pieces, or purpose-built kitchen carts.
Size and placement are critical. A standard kitchen island is 24 to 36 inches deep and 36 to 48 inches wide, leaving at least 42 inches of walkway space on all sides (per most building codes). If your kitchen is tight, a slim 24-inch-wide cart fits as a supplementary station without crowding.
Materials vary widely. Wood islands ($300–$1,200) offer traditional warmth. Metal-frame carts with butcher-block or stainless steel tops ($200–$800) lean modern and industrial. Repurposed pieces, an old dresser with a butcher-block top or a salvaged bar cart, cost less and add character if you’re willing to DIY the conversion.
Storage capacity depends on design. Open shelves below the top are easy to access: drawers slow you down a touch but hide clutter better. Most islands include a wine rack, cookbook shelf, or spice rack as bonus features. If you have plumbing skills, adding a prep sink turns an island into a true work hub, though this requires rough-in lines and a disposal, crossing into semi-permanent territory.
As a practical note, kitchen islands require a level floor. If your kitchen slopes (common in older homes), shim the base with hardwood wedges to keep the island stable.
Rolling Carts and Mobile Storage Units
Rolling carts are flexibility incarnate. Unlike fixed islands, they roll where you need them, next to your prep counter, over to the cooktop, or tucked beside the fridge when not in use. This makes them ideal for kitchens where space is at a premium or layouts don’t accommodate a permanent island.
Quality matters more than you’d think. Casters (wheels) should be 2 to 3 inches in diameter, rated for at least 100 to 150 pounds per cart, and have a locking mechanism to prevent rolling. Swivel casters allow tight turns: fixed casters run in one direction. A mix of both (swivel front, fixed back) gives you control and mobility.
Three-tier metal carts ($80–$200) are workhorse options. Stainless steel won’t rust near water: powder-coated steel works fine but chips if dinged. Wire shelves are open and easy to clean: solid shelves hide items but limit visibility. Wooden carts with rolling bases ($150–$400) feel more integrated into kitchen aesthetics but require more care around water.
What fits on a rolling cart? Small appliances (toaster, blender, coffee maker), bulk pantry items, produce, cookbooks, or linens. One shelf might hold cooking oils and vinegars: another, baking ingredients in clear containers. Dedicate the bottom tier to heavier items or bulk goods.
Practical tip: if you have tile or hardwood floors, casters glide easily. Carpet or uneven concrete will fight you. Also, casters are loud on hard floors, if noise bothers you, consider a cart with silent or soft-grip wheels, though these cost a bit more. Rolling carts typically last 3 to 5 years of regular use before casters wear out or start squeaking: replacement casters cost $20 to $40 for a set of four.
Pegboards and Wall Hooks for Organized Simplicity
Pegboards are the unsung heroes of kitchen organization. A pegboard is a perforated hardboard panel (typically 1/4 inch thick, usually in 4×8-foot sheets) mounted flush to a wall, where hooks, shelves, and baskets hang from 1/4-inch wooden pegs. It’s cheap, modular, and honest, no pretense, just function.
Installation is straightforward. Mount the board to wall studs using lag bolts or heavy-duty screws, spacing fasteners every 16 inches. Install a 1/4-inch spacer (thin strips of wood) behind the pegboard so pegs slide in cleanly and air circulates (preventing moisture damage). A typical 4×2-foot pegboard costs $15 to $30: hooks and shelves run $1 to $5 each.
What goes on a pegboard? Frequently used utensils (spatulas, tongs, wooden spoons), cutting boards, measuring cups, aprons, linens, even small baskets for tea bags or herb packets. The beauty is rearranging in seconds, no tools needed. Paint the pegboard or stain the wood to match your kitchen aesthetic. Matte black, white, natural wood, or bold colors all work depending on your style.
One caveat: pegboards look best when arranged intentionally, not crammed. Leave breathing room between items. Overcrowding defeats the purpose. Also, regularly wipe the board to prevent dust accumulation, a soft brush or damp cloth works.
Wall hooks alone (without pegboards) offer a simpler alternative. Stainless steel or powder-coated hooks, mounted directly into studs, can hold cast iron skillets, aprons, cutting boards, and hanging baskets for $5 to $15 per hook. They’re minimal, durable, and require just one screw per hook.
Mix-and-Match Furniture Pieces for Custom Storage
Many homeowners don’t realize kitchen storage doesn’t have to come from kitchen-specific brands. Buffets, hutches, bookshelves, and vintage dressers, pieces designed for dining rooms, living rooms, or bedrooms, work beautifully in kitchens when positioned and finished thoughtfully.
A tall bookshelf (wood, 30 to 36 inches wide, 5 to 7 feet tall) becomes a pantry. Mix dishware on upper shelves with cookbooks, small appliances, and glass canisters of bulk pantry items below. Cost: $150 to $400 for solid wood, versus $800+ for kitchen-specific pantry cabinets. A vintage sideboard or buffet ($200–$800 used or reproduced) provides lower storage for linens, cookware, and appliances while the top surface serves as extra counter space.
When sourcing secondhand pieces, check structural integrity. Ensure drawers slide smoothly, shelves aren’t warped, and wood isn’t rotten. Refinishing or painting extends life. A coat of food-safe finish (polyurethane or conversion varnish, not standard polyester) protects wood from water and heat. Cabinet paint ($30–$60 per quart) and primer ($20–$40 per quart) refresh tired finishes: budget 2 to 3 days for prep, painting, and drying.
Mixing styles, a painted wooden sideboard alongside stainless steel shelving or a reclaimed wood table with modern bar stools, creates visual interest and tells a story. The kitchen feels curated rather than catalog-ordered. This approach also lets you spread costs over time. You’re not committing to a $10,000 kitchen renovation: you’re gathering pieces as you find them, testing layouts, and evolving the space.
Important: ensure any piece you bring into the kitchen can handle moisture and heat. Avoid plywood or particleboard (they swell when wet). Solid wood or metal-frame pieces are safer bets. And position tall furniture away from direct heat sources like the cooktop. Kitchens without upper cabinets often blend new and vintage pieces to striking effect, proving that mixing furniture styles is both practical and visually compelling.
Conclusion
A kitchen without traditional cabinets isn’t about going bare, it’s about choosing storage that works harder and shows more intentionality. Whether you opt for floating shelves, a rolling cart, pegboards, or freestanding pieces, the goal remains the same: keep what you use within reach, make the kitchen feel open and functional, and build a space that reflects how you actually cook. Start with one solution and build from there. You’ll find what works for your space, your routine, and your style.